Windows Docker Containers 101
Docker runs natively on Windows 10 and Windows Server 2016. In this lab you’ll learn how to package Windows applications as Docker images and run them as Docker containers. You’ll learn how to create a cluster of Docker servers in swarm mode, and deploy an application as a highly-available service.
Difficulty: Beginner
Time: Approximately 30 minutes
Tasks:
Document conventions
When you encounter a phrase in between < and > you are meant to substitute in a different value.
For instance if you see $ip = <ip-address> you would actually type something like $ip = '10.0.0.4'
You will be asked to RDP into various servers.
Prerequisites
You will need a set of Windows Server 2016 virtual machines running in Azure, which are already configured with Docker and the Windows base images. You do not need Docker running on your laptop, but you will need a Remote Desktop client to connect to the VMs.
- Windows - use the built-in Remote Desktop Connection app.
- Mac - install Microsoft Remote Desktop from the app store.
- Linux - install Remmina, or any RDP client you prefer.
You will build images and push them to Docker Cloud, so you can pull them on different Docker hosts. You will need a Docker ID.
- Sign up for a free Docker ID on Docker Cloud
Prerequisite Task: Prepare your lab environment
Start by ensuring you have the latest lab source code. RDP into one of your Azure VMs, and open a PowerShell prompt with the “Run as Administator” option.
If you’re using a VM provided for a Docker lab, you will find the source code is already cloned, just run these commands to update it:
cd C:\scm\github\docker\labs
git pull
If you’re using your own VM, clone the lab repo from GitHub:
mkdir -p C:\scm\github\docker
cd C:\scm\github\docker
git clone https://github.com/docker/labs.git
Now set set some variables for your source path and Docker ID, so you can copy and paste commands from the lab:
$labRoot='C:\scm\github\docker\labs\dockercon-us-2017\windows-101'
$dockerId='<Your Docker ID>'
Lastly clear up anything left from a previous lab. You only need to do this if you have used this VM for one of the other Windows labs, but you can run it sefaly to restore Docker to a clean state.
This stops and removes all running containers, and then leaves the swarm - ignore any error messages you see:
docker container rm -f $(docker container ls -a -q)
docker swarm leave -f
Task 1: Run some simple Windows Docker containers
There are different ways to use containers:
- In the background for long-running services like websites and databases
- Interactively for connecting to the container like a remote server
- To run a single task, which could be a PowerShell script or a custom app
In this section you’ll try each of those options and see how Docker manages the workload. Before you start, let’s check the Docker service is up and running. RDP into one of your Azure VMs, open a PowerShell prompt from the taskbar shortcut, and run:
docker version
The Docker CLI connects to the Docker API running as a Windows Service, and you will see two sets of output. The first tells you the version and operating system where the Docker client is running, and the second tells you the version and operating system where the Docker service is running. Docker is cross-platform, so you can manage Linux hosts from Windows clients, and Windows hosts from Linux or Mac clients.
Task 1.1: Run a task in a Nano Server container
This is the simplest kind of container to start with. In PowerShell run:
docker container run microsoft/nanoserver powershell Write-Output Hello DockerCon 2017!
You’ll see the output written from the PowerShell command. Here’s what Docker did:
- created a new container from the microsoft/nanoserver image, which has a basic Nano Server deployment, maintained by Microsoft
- started the container, running the
powershellcommand and passing theWrite-Output...arguments - relayed the console output from the container to the PowerShell window
Docker keeps a container running as long as the process it started inside the container is still running. In this case the powershell process completes when the Write-Output command finishes, so the container stops. The Docker platform is cautious with your data - it doesn’t delete resources by default, so the container still exists. You can list all the containers on the system and see the Nano Server container is still there, but is in the Exited state:
> docker container ls --all
CONTAINER ID        IMAGE                  COMMAND                  CREATED             STATUS                      PORTS               NAMES
a525b7fb086b        microsoft/nanoserver   "powershell Write-..."   31 seconds ago      Exited (0) 19 seconds ago                       peaceful_benz
Containers which do one task and then exit can be very useful. You could build a Docker image which installs the Azure PowerShell module and bundles a set of custom scripts to create a cloud deployment. Anyone can execute that task just by running the container - they don’t need the scripts or the right version of the Azure module, they just need to pull the Docker image.
Task 1.2: Run an interactive Windows Server Core container
Nano Server is a new operating system from Microsoft which supports a subset of the full Windows APIs. You can use it to package cross-platform applications like Java, Go, Node.js and .NET Core, but not full .NET Framework apps. For that there’s the microsoft/windowsservercore image which is a full Windows Server 2016 OS, without the UI.
You can explore an image by running an interactive container. Run this to start a Windows Server Core container and connect to it:
docker container run -it --rm microsoft/windowsservercore powershell
-itmeans run the container interactively, and connect a terminal session--rmmeans automatically remove the container when it exits
When the container starts you’ll drop into a PowerShell session with the default prompt PS C:\>. This is PowerShell running inside a Windows Server Core container. Docker has attached to the console, relaying input and output between your PowerShell window and the PowerShell session in the container.
Run some commands to see how the Windows Server Core image is built:
ls c:\- lists the C drive contents, you’ll see this is a minimal installation of WindowsGet-Process- shows all running processes in the container. There are a number of Windows Services, and the PowerShell exeGet-WindowsFeature- shows the Windows feature which are available or already installed
You’ll see that the base image has .NET 4.6 installed, which is backwards-compatible so you can run .NET 2.0 apps. Almost all Windows Server features are available (.NET 3.5 is an exception, but the microsoft/aspnet:3.5 image comes with that installed). You can install them with the Add-WindowsFeature cmdlet, which is how you would start to build up a custom application image from the base image, adding in the features you need.
Interactive containers are useful when you are putting together your own image. You can run a container and verify all the steps you need to deploy your app. Once you have it working, you can commit a running container to an image - but it’s much better to capture those steps in a repeatable Dockerfile. You’ll do that in a later task.
Now run exit to leave the PowerShell session. That stops the container process, so the container exits. You ran the container with the --rm flag, so Docker will delete it. Run docker container ls -a now and you’ll see only the original Nano Server container.
Run a background IIS web server container
Background containers are how you’ll run your application. Here’s a simple example using another image from Microsoft - microsoft/iis which builds on top of the Windows Server Core image and installs the IIS Web Server feature:
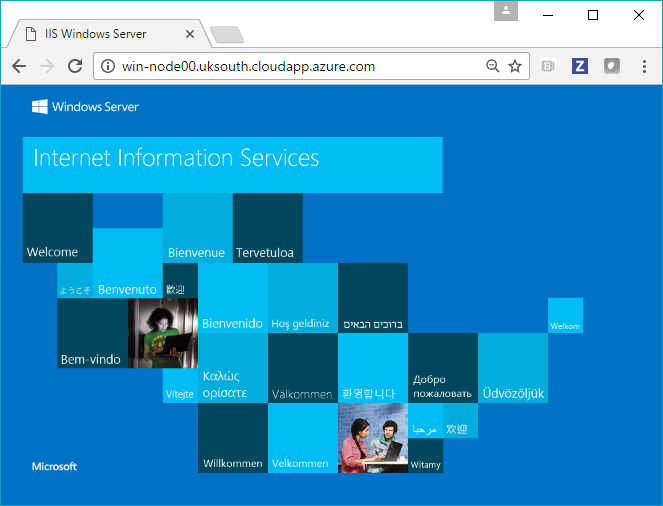
docker container run -d -p 80:80 --name iis microsoft/iis
-dstarts in detached mode, Docker runs the container in the background and monitors it-ppublishes a port. The IIS image is built to allow traffic in on port 80. This maps port 80 on the host to port 80 in the container--namegives the container a name so you can refer to it in management commands
Open a browser on your laptop and go to the address of your VM. You’ll see the basic IIS homepage, which is being served by the container:
Publishing the container port means any traffic the VM receives on port 80 gets forwarded to the IIS container, and the responses are forwarded back. Back in your Windows Server VM, run docker container ls and you’ll see the IIS container is still running. Run Get-Process and you’ll see all the processes running in the VM, which will include a line for the IIS worker process running in the container, w3wp - something like this:
Handles  NPM(K)    PM(K)      WS(K)     CPU(s)     Id  SI ProcessName
-------  ------    -----      -----     ------     --  -- -----------
...
    187      19     4944      13096       0.09   4916   4 w3wp
It’s important to realize that the container process - w3wp.exe in this case - is actually running on the host. That’s what makes Docker containers so lightweight and so efficient, all containers are sharing the host’s operating system. The container is using the filesystem built in the microsoft/iis image, which is where the w3wp.exe executable lives. The Azure VM doesn’t have IIS installed, everything the app needs is packaged in the image.
Task 2: Package and run a custom app using Docker
Next you’ll learn how to package your own Windows app as a Docker image, using a Dockerfile.
The Dockerfile is a simple script which contains all the steps to deploy your application. You need to use an existing image as the starting point for your app, but you decide which one. You can use the base Windows Server or Nano Server image, or an official image with the app platform you need already installed - like openjdk:windowsservercore which is good for running Java apps in Windows Docker containers.
The Dockerfile syntax is simple. In this task you’ll walk through a Dockerfile for a custom website, and see how to package and run it with Docker.
Have a look at the Dockerfile for the lab, which builds a simple static website running on IIS. These are the main features:
- it is based FROM
microsoft/windowsservercore, so the image will start with a clean Windows Server 2016 deployment - it uses the SHELL instruction to switch to PowerShell when building the Dockerfile, so the commands to run are all in PowerShell
- it adds the IIS Windows feature and exposes port 80, setting up the web server and allowing traffic into containers on port 80
- it configures IIS to write all log output to a single file, using the
Set-WebConfigurationPropertycmdlet - it copies the start.ps1 startup script and index.html files from the host into the image
- it specifies
start.ps1as the CMD to run when containers start. The script starts the IIS Windows Service and relays the log file entries to the console - it adds a HEALTHCHECK which makes an HTTP GET request to the site and returns whether it got a 200 response code
Task 2.1: Build a custom website image
The Docker platform has the capability to build, ship and run software.
To build the Dockerfile into a Docker image, open a PowerShell prompt on the Windows VM, change to the tweet-app directory and run the docker image build command:
cd $labRoot\tweet-app
docker image build -t "$dockerId/dockercon-tweet-app" .
--t tags the image, giving it a name you use to push the image or run containers
Be sure to use your Docker ID in the image tag. You will share it on Docker Cloud in the next step, and you can only do that if you use your ID. My Docker ID is
sixeyed, so I rundocker build -t sixeyed/dockercon-tweet-app
You’ll see output on the screen as Docker runs each instruction in the Dockerfile, starting like this:
Sending build context to Docker daemon 6.144 kB
Step 1/10 : FROM microsoft/windowsservercore
 ---> b4713e4d8bab
Step 2/10 : SHELL powershell -Command $ErrorActionPreference = 'Stop'; $ProgressPreference = 'SilentlyContinue';
...
The build command will take a little while to run, as the step to install IIS takes a while in Windows. Once it’s built you’ll see a Successfully built... message. If you repeat the docker build command again, it will complete in seconds. That’s because Docker caches the image layers and only runs instructions if the Dockerfile has changed since the cached version.
Now if you list the images and filter on the dockercon name, you’ll see your new image:
> docker image ls -f reference=*/dockercon*

REPOSITORY                    TAG                 IMAGE ID            CREATED             SIZE
sixeyed/dockercon-tweet-app   latest              a14860778046        11 minutes ago      10.4 GB
Docker has built the image but it’s only stored on the local machine. Next you’ll push it to a public repository.
Task 2.2: Push your image to Docker Cloud
Distribution is built into the Docker platform. You can build images locally and push them to a registry, making them available to other users. Anyone with access can pull that image and run a container from it. The behavior of the app in the container will be the same for everyone, because the image contains the fully-configured app - the only requirements to run it are Windows and Docker.
You can push your website image to Docker Cloud, and later in the lab we’ll pull it on other servers and run it on a cluster. When you push to Cloud, if you make it a public repository, it is also available to others on Docker Store, the public registry for Docker images. To push images, you need to log in using the command line and providing your Docker ID credentials:
> docker login
Login with your Docker ID to push and pull images from Docker Cloud. If you don't have a Docker ID, head over to https://cloud.docker.com to create one.
Username: <DockerID>
Password:
Login Succeeded
Now upload your image to the Hub:
docker image push $dockerId/dockercon-tweet-app
You’ll see the upload progress for each layer in the Docker image. The IIS layer is almost 300MB so that will take a few seconds. The whole image is over 10GB, but the bulk of that is in the Windows Server Core base image. Those layers are already stored in Docker Cloud, so they don’t get uploaded - only the new parts of the image get pushed.
You can browse to https://store.docker.com/community/images/<DockerID>/dockercon-tweet-app and see your newly-pushed app image. This is a public repository, so anyone can pull the image - you don’t even need a Docker ID to pull public images.
Task 2.3: Run your website in a container
It’s time to run your app and see what it does! First, clear up any containers which are still running by forcing them to stop and then removing them:
docker container rm -f $(docker container ls -a -q)
container ls -a -qlists all containers and just returns the ID - which is suitable to feed into thermcommand to remove containers
This is a web application, so you’ll run it in the background and publish the HTTP port in the same way that you did with the IIS image:
docker container run -d -p 80:80 $dockerId/dockercon-tweet-app
When the application starts, browse to the VM address from your laptop browser and you’ll see the web app:
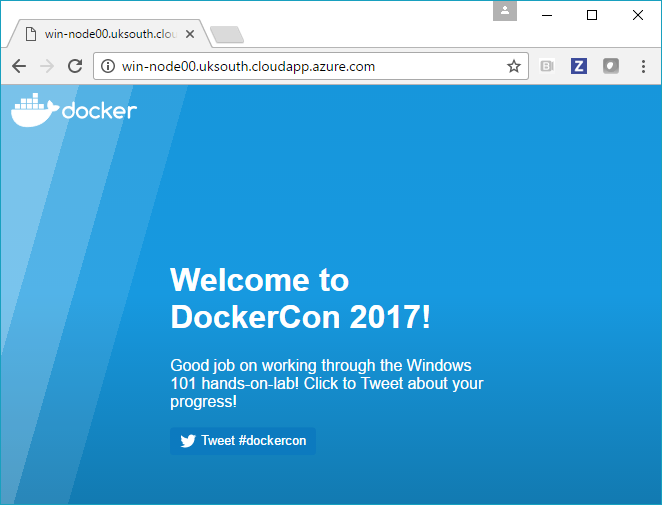
Go ahead and hit the button to Tweet about your lab progress! No data gets stored in the container, so your credentials are safe.
Task 3: Run your app in a highly-available cluster
Your app is packaged in a portable Docker image, and you can rebuild it any time with a simple script. You’ve shared it on Docker Cloud and deployed it on a cloud server, but at the moment you just have a single VM serving your app. That doesn’t give you high availability, and for a tier 1 app like this you’ll want to avoid downtime if there are any issues with the VM.
Docker supports failover and scaling with a clustering technology built right into the engine - Docker swarm mode. You don’t need anything extra to turn a set of machines into a highly-available cluster, just Windows and Docker. In the rest of this lab you’ll set up a single-node swarm and deploy your app as a service.
A single-node swarm doesn’t give you high availability, but it’s great for testing deployments non-production environments.
Task 3.1: Create a Docker swarm with Windows Server
There are two server roles in a Docker swarm - managers and workers. You’ll make the VM into a single-node swarm, so it will be a manager. Managers can run application workloads as well as workers. Start by clearing down running containers again:
docker container rm -f $(docker container ls -a -q)
Switch to swarm mode. Run the swarm init command to initialize the swarm:
docker swarm init
Your RDP session may be interrupted because of a network change when the node switches to swarm mode. It will reconnect in a few seconds.
The output shows you that Docker is now in swarm mode, and it gives you the secret token you need to join other nodes to the swarm. The token is used to stop rogue nodes joining your swarm, so you should keep it secure - like a database connection string. The swarm init command output looks like this:
Swarm initialized: current node (i0rfsqu9x53mk4eno0kltocul) is now a manager.

To add a worker to this swarm, run the following command:

    docker swarm join --token SWMTKN-1-4ceehsi885na4zynpj6eu425863zc360xqu3jvq7jfbi2937j1-da80w5qdzony7iw5u3ap0gps8 10.0.0.7:2377

To add a manager to this swarm, run 'docker swarm join-token manager' and follow the instructions.
For a HA environment you would add extra nodes to the swarm. In production you need three managers for failover, and as many workers as you need for your applications.
Now you have a fully-featured Docker swarm, which you can create into cluster of Docker servers. You’ll administer the swarm from the manager node.
Task 3.2: Deploy your website as a service
Swarm mode is an orchestration engine - you use it to deploy highly-available, scalable, distributed solutions. You don’t run containers in swarm mode - instead you create services and specify the number of replicas each service should have. Replicas are just containers, but the swarm decides which node to create them on, based on the capacity of the nodes when more containers are needed.
You can run your web app as service with docker service create:
docker service create `
 --publish mode=host,target=80,published=80 `
 --detach=true `
 --replicas=1 `
 --name tweet-app `
$dockerId/dockercon-tweet-app
--publishpublishes the ports, but you use a special syntax in swarm mode--replicasstates how many containers should run the service--namegives the service a name for administration and discovery
Docker will create one container from the image, and schedule it to run across the nodes in the cluster. In a multi-node swarm, the scheduler will use different nodes for each replica if it can, but in this case it can only run the replica on the manager node.
Run docker service ps to see the containers which are running the service replicas:
> docker service ps tweet-app
ID                  NAME                IMAGE                                NODE                DESIRED STATE       CURRENT STATE                  ERROR               PORTS
vhjsgt6a2goh        tweet-app.1         sixeyed/dockercon-tweet-app:latest   avanade-prep3       Running             Preparing about a minute ago
You’ll see there’s one container running on the manager node. Browse to the VM address from your laptop and you will see the Tweet app is still running.
In a production environment you would have a load balancer as the entrypoint to your application, distributing traffic among multiple swarm nodes. Any node can receive a request and respond to it. You would also have a healthcheck in the load balancer so traffic only reached healthy nodes - that lets you do zero-downtime updates of your Docker service.
Wrap Up
Thank you for taking the time to complete this lab! You now know how to use Docker on Windows, how to package your own apps as Docker images, and how to run multiple Windows servers as a Docker swarm for high-availability and scale.
Do try the other Windows labs at DockerCon, and make a note to check out the full lab suite when you get home - there are plenty more Windows walkthroughs at docker/labs on GitHub.