Modernize .NET Apps - for Ops
You’ll already have a process for deploying ASP.NET apps, but it probably involves a lot of manual steps. Work like copying application content between servers, running interactive setup programs, modifying configuration items and manual smoke tests all add time and risk to deployments.
In Docker, the process of packaging applications is completely automated, and the platform supports automatic update and rollback for application deployments. You can build Docker images from your existing application artifacts, and run ASP.NET apps in containers without going back to source code.
This lab is aimed at ops and system admins. It steps through packaging an ASP.NET WebForms app to run in a Docker container on Windows 10 or Windows Server 2016. It starts with an MSI and ends by showing you how to run and update the application as a highly-available service on Docker swam.
What You Will Learn
You’ll learn how to:
-
Package an existing ASP.NET MSI so the app runs in Docker, without any application changes.
-
Create an upgraded package with application updates and Windows patches.
-
Update and rollback the running application in a production environment with zero downtime.
Difficulty: Beginner
Time: Approximately 30 minutes
Tasks:
Document conventions
When you encounter a phrase in between < and > you are meant to substitute in a different value.
For instance if you see $ip = <ip-address> you would actually type something like $ip = '10.0.0.4'
You will be asked to RDP into various servers. You will find the actual server names to use in your welcome email.
Prerequisites
You will need a set of Windows Server 2016 virtual machines running in Azure, which are already configured with Docker and the Windows base images. You do not need Docker running on your laptop, but you will need a Remote Desktop client to connect to the VMs.
- Windows - use the built-in Remote Desktop Connection app.
- Mac - install Microsoft Remote Desktop from the app store.
- Linux - install Remmina, or any RDP client you prefer.
When you connect to the VM, if you are prompted to run Windows Update, you should cancel out. The labs have been tested with the existing VM state and any changes may cause problems.
You will build images and push them to Docker Cloud, so you can pull them on different Docker hosts. You will need a Docker ID.
- Sign up for a free Docker ID on Docker Cloud
Prerequisite Task: Prepare your lab environment
Start by ensuring you have the latest lab source code. RDP into one of your Azure VMs, and open a PowerShell prompt with the “Run as Administator” option.
If you’re using a VM provided for a Docker lab, you will find the source code is already cloned, just run these commands to update it:
cd C:\scm\github\docker\labs
git pull
If you’re using your own VM, clone the lab repo from GitHub:
mkdir -p C:\scm\github\docker
cd C:\scm\github\docker
git clone https://github.com/docker/labs.git
Now set set some variables for your source path and Docker ID, so you can copy and paste commands from the lab:
$labRoot='C:\scm\github\docker\labs\dockercon-us-2017\windows-modernize-aspnet-ops'
$dockerId='<Your Docker ID>'
Now clear up anything left from a previous lab. You only need to do this if you have used this VM for one of the other Windows labs, but you can run it sefaly to restore Docker to a clean state.
This stops and removes all running containers, and then leaves the swarm - ignore any error messages you see:
docker container rm -f $(docker container ls -a -q)
docker swarm leave -f
Task 1: Packaging ASP.NET apps as Docker images
A Docker image packages your application and all the dependencies it needs to run into one unit. Microsoft maintain the microsoft/aspnet image on Docker Store, which you can use as the basis for your own application images. It is based on microsoft/windowsservercore and has IIS and ASP.NET already installed.
In this lab you’ll start with an MSI that deploys a web app onto a server and expects IIS and ASP.NET to be configured. If you already have a scripted build process then you may have MSIs or Web Deploy packages already being generated, and it’s easy to package them into a Docker image.
Task 1.1: Installing MSIs in Docker images
Building a Docker image from an MSI is simple, you just need to copy in the msi file and run msiexec to install it. Have a look at the Dockerfile for the app you’re going to deploy and later upgrade.
If you noticed the version of microsoft/windowsservercore is an old one - that’s deliberate. You’ll be updating the Windows version as well as the app version in this lab.
There are just three lines of Dockerfile instructions:
FROMspecifies the base image to use as a starting point, in this case a specific version of the ASP.NET imageCOPYcopies the existing v1.0 application MSI from the local machine into the Docker imageRUNinstalls the MSI usingmsiexec, with theqnswitch to install silently, and passing a value to the customRELEASENAMEvariable that the MSI uses
Task 1.2: Building the v1.0 application image
Every Docker image has a unique name, and you can also tag images with additional information like application version numbers. On your VM, change to the v1.0 directory and build the Dockerfile:
cd $labRoot\v1.0
docker image build -t $dockerId/modernize-aspnet-ops:1.0 .
Be sure to tag the image with your own Docker ID - you’ll be pushing it to Docker Cloud next.
The output from docker build shows you the Docker engine executing all the steps in the Dockerfile. On your lab VM the base images have already been pulled, so the image should build quickly.
When the build completes you’ll have a new image stored locally, with the name <DockerId>/modernize-aspnet-ops and the tag 1.0 indicating that this is version 1.0 of the app.
Login to Docker Cloud with your Docker ID and push that image, so it’s available for the other VMs you’ll use later on:
docker login
...
docker image push $dockerId/modernize-aspnet-ops:1.0
Task 1.3: Running the Application v1.0 in Docker
The sample application for the lab is a simple ASP.NET WebForms app, which the MSI installs to the default IIS website running on port 80. To start the application, use docker run and publish the port from the container onto the host, so the website is available externally:
docker container run -d -p 80:80 --name v1.0 $dockerId/modernize-aspnet-ops:1.0
-dstarts the container in detached mode, so Docker keeps it running in the background-ppublishes port 80 on the container to port 80 on the host, so Docker directs incoming traffic into the container--namegives the container the namev1.0, so you can refer to it in other Docker commands
docker ps will show you that the container is running, together with the port mapping and the command running inside the container:
> docker ps
CONTAINER ID        IMAGE                              COMMAND                   CREATED             STATUS              PORTS                NAMES
27b54d30301f        sixeyed/modernize-aspnet-ops:1.0   "C:\\ServiceMonitor..."   41 seconds ago      Up 38 seconds       0.0.0.0:80->80/tcp   v1.0
You can get basic management information about the container with docker container top v1.0 to list the running processes, and docker container logs v1.0 to view application log entries. In this case, IIS doesn’t write any logs to the console so there won’t be any log entries surfaced to Docker.
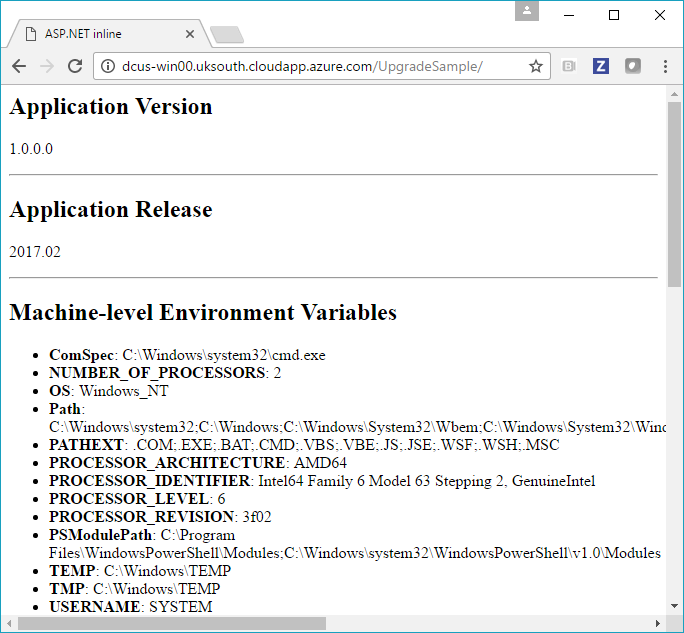
Open a browser on your laptop and browse to the app on your VM: http://<azure-vm-address>/UpgradeSample. You’ll see the sample app, which just shows some basic diagnostics details:
Task 2: Upgrading Application Images
The Docker image tagged 1.0 is a snapshot of the application, built with a specific version of the app and a specific version of Windows. When you have an upgrade to the app or an operating system update you don’t make changes to the running container - you build a new Docker image which packages the updated components and replace the container with a new one.
Microsoft are releasing regular updates to the Windows base images on Docker Store. When your applications are running in Docker containers, there is no ‘Patch Tuesday’ with manual or semi-automated update processes. The Docker build process is fully automated, so when a new version of the base image is released with security patches, you just need to rebuild your own images and replace the running containers.
Task 2.1: Updating Windows and app versions
Take a look at the updated Dockerfile for version 1.1 of the application. It’s the same structure as 1.0 but with some important changes:
- the
FROMimage is tagged with version10.0.14393.693, which is a later Windows image. v1.0 was built on Windows version10.0.14393.576 - the MSI is version
1.1.0.0which contains an updated application release - the MSI parameter
RELEASENAMEhas been changed to2017.03- this value gets shown in the web app
The Dockerfile is still a simple 3-line script. All that’s changed are the version details for Windows and the application. The regular monthly updates to the Windows images contain all the latest security patches and hotfixes.
Version 1.1 represents a change to the app which coincides with an updated Windows version being available, so it packages both application and OS updates.
Task 2.2: Building the v1.1 Application Image
The process to build the new version is identical. In PowerShell, switch to the 1.1 directory and run docker build, using a new tag to identify the version:
cd $labRoot\v1.1
docker image build -t <DockerId>/modernize-aspnet-ops:1.1 .
Now you have two application images, tagged 1.0 and 1.1, each containing different versions of the application built on different versions of Windows. You can see the basic image details with the docker image ls command:
> docker image ls --filter reference='*/modernize*'
REPOSITORY                                   TAG                 IMAGE ID            CREATED             SIZE
sixeyed/modernize-aspnet-ops           1.1                 dcea5c0e1be9        41 minutes ago      10.1 GB
sixeyed/modernize-aspnet-ops           1.0                 e763f76db517        About an hour ago   10 GB
You can see the images are listed at around 10GB each, but this is the logical size. Physically, the images share the majority of data in read-only image layers. There are a lot more images on your lab VM - run docker image ls to see them all, and then run docker system df to see how much physical storage they are using.
You’ll see there are around 20 images, with logical sizes totalling over 170GB - but the actual storage used is only around 20GB.
Task 2.3: Upgrading the running application
Version 1.0 of the application is still running, and the container port is mapped to port 80 on the host. Only one process can listen on a port, so you can’t start a new container which also listens on port 80.
You can test out the new version locally on the VM by running a new container without publishing any ports:
docker container run -d --name v1.1 <DockerId>/modernize-aspnet-ops:1.1
With no published ports, the container is not accessible outside of the VM. To browse the new site on the VM, you need to find the container’s IP address by running:
docker container inspect --format '' v1.1
You can open Firefox on the VM and browse to http://<container-ip-address>/UpgradeSample to see the updated version of the app:
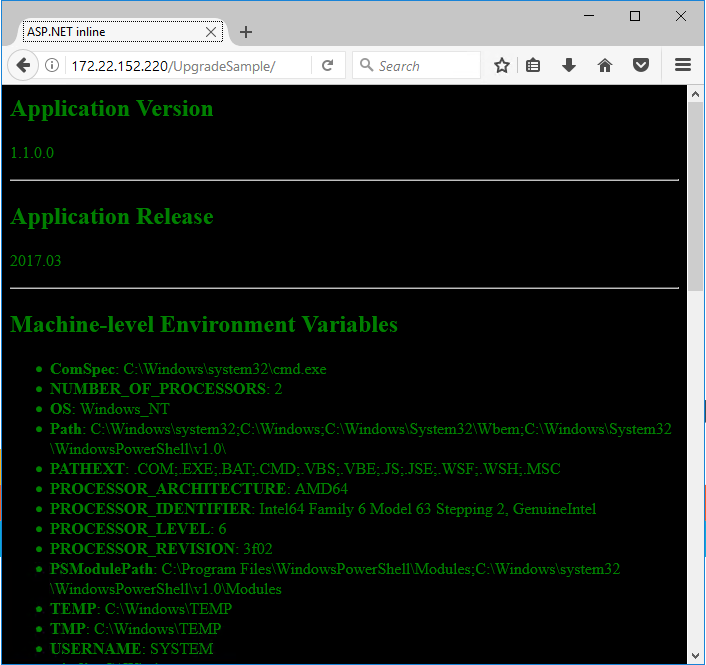
The new website content shows the updated application version number, which is read from the app DLL, and the release version number, which is read from the MSI parameter. The colors have changed too, to make the versions stand out when you’re running side-by-side.
In non-production environments you can upgrade just by killing the old container and starting a new one, using the new image and mapping to the original port. That’s a manual approach which will incur a few seconds downtime. Docker provides an automated, zero-downtime alternative which you’ll use instead.
For that you’ll create a swarm, clustering all three of your lab VMs. The other nodes will need the upgraded image, so push version 1.1 to Docker Cloud too:
docker image push $dockerId/modernize-aspnet-ops:1.1
Task 3: Zero-Downtime updates
The Docker platform supports automated rolling updates, so you can have a zero-downtime update of your app. To get zero-downtime deployment you need to run your application containers as a service in a Docker swarm - a cluster of machines all running Docker, which you manage as a single unit.
In an update, Docker incrementally stops the running containers and starts new ones from the updated image. For production environments where you have a load-balancer directing traffic to nodes, it would not send any requests to a node which Docker is updating, so your application stays online.
Task 3.1: Create a Windows Docker swarm
Swarm mode is a clustering technology built into the Docker engine. You need multiple VMs to create a high-availability swarm, but you can create a single-node swarm to learn the management processes.
There are two server roles in a Docker swarm - managers and workers. You’ll make the VM into a single-node swarm, so it will be a manager. Managers can run application workloads as well as workers. Start by clearing down running containers again:
docker container rm -f $(docker container ls -a -q)
Switch to swarm mode. Run the swarm init command to initialize the swarm:
docker swarm init
Your RDP session may be interrupted because of a network change when the node switches to swarm mode. It will reconnect in a few seconds.
The output tells you this node is now a manager, and gives you a secret token for joining other nodes to the swarm.
Task 3.2: Run application version 1.0 as a service
In swarm mode, you don’t run individual containers. Instead you create services and the swarm decides which node to run the containers on. For services which run across many containers, Docker will spread them across as many hosts as possible, to maximise redundancy.
To run the web app on your swarm, create it with a replica level of 3 and Docker will run a container on each node:
docker service create `
  --name sample `
  --publish mode=host,target=80,published=80 `
  --detach=true `
  --replicas=1 `
  --with-registry-auth `
  $dockerId/modernize-aspnet-ops:1.0
--name- is the name of the service, this is how you refer to the service for management, and in other services that consume this one--publish- maps the container port to the host port. Note that the syntax is different in swarm mode, but the functionality is the same--replicas- the number of containers that run the service. Docker will maintain the service level by starting new containers when needed
You can check on the service with docker service ls, which should show you have ome out of one replicas running.
Run service ps to list the containers in the service and see which nodes they’re running on:
> docker service ps sample
ID                  NAME                IMAGE                              NODE                DESIRED STATE       CURRENT STATE            ERROR               PORTS
pedhy0x72gih        sample.1            sixeyed/modernize-aspnet-ops:1.0   dcus-win00          Running             Running 41 seconds ago                       *:80->80/tcp
With a single-node swarm and a sinfle replica, you’ll see one container on the manager node. On your laptop you can browse to the Azure VM address and see version 1.0 of the app running.
Services in swarm mode are first-class citizens, and they can be updated using built-in platform functionality.
Task 3.3: Upgrade to application version 1.1
The update process runs against a service, and updates it to a specified image version. It does that by stopping the existing containers, and starting new ones.
In a highly-available swarm where you have a service running in many containers on many hosts, fronted by a load-balancer, this is a zero-downtime deployment. The load balancer only sends traffic to active containers, so old containers won’t get traffic when they’re stopped, and new containers won’t get traffic until they’re online.
To update your service to version 1.1, run:
docker service update --with-registry-auth --image $dockerId/modernize-aspnet-ops:1.1 sample
That tells Docker to update the sample service to version 1.1 of the image. With a multi-node swarm you would configure a load balancer in front the nodes and you would get zero-downtime deployment.
Automated updates are a huge benefit of the Docker platform. Updating a distributed application in a safe, automated way takes all the risk out of deployments, and makes frequent releases possible. If you don’t like the new color scheme in v1.1 you can easily roll back to v1.0:
docker service update --rollback sample
Rolling back is conceptually the same as updating. The existing containers are stopped, and new containers created using the original image version. Browse to the site now and you will see version 1.0 running again. Automated rollback may be an even bigger benefit than automatic update. Knowing you can revert to the previous good version without any downtime and without a lengthy manual procedure gives you confidence in your deployment process, even if there are problems in the application itself.
Wrap Up
Thank you for taking the time to complete this lab! You now know how to package an existing ASP.NET app as a Docker image, without touching the source code. You also know how to package a new version of your image, containing application updates and the latest Windows patches. You’ve also seen how to run a highly-available service in Docker swarm mode.
Do try the other Windows labs at DockerCon, and make a note to check out the full lab suite when you get home - there are plenty more Windows walkthroughs at docker/labs on GitHub.