Packaging ASP.NET Apps as Docker Images
A Docker image packages your application and all the dependencies it needs to run into one unit. Microsoft maintain the microsoft/aspnet image on Docker Store, which you can use as the basis for your own application images. It is based on microsoft/windowsservercore and has IIS and ASP.NET already installed.
In this lab I start with an MSI that deploys a web app onto a server and expects IIS and ASP.NET to be configured. If you already have a scripted build process then you may have MSIs or Web Deploy packages already being generated, and it’s easy to package them into a Docker image.
Installing MSIs in Docker images
Here’s the whole Dockerfile for packaging my custom web application:
FROM microsoft/aspnet:windowsservercore-10.0.14393.576

COPY UpgradeSample-1.0.0.0.msi /

RUN msiexec /i c:\UpgradeSample-1.0.0.0.msi RELEASENAME=2017.02 /qn
It’s just three lines of script in the simple Dockerfile syntax:
FROMspecifies the base image to use as a starting point, in this case a specific version of the ASP.NET imageCOPYcopies the existing v1.0 application MSI from the local machine into the Docker imageRUNinstalls the MSI usingmsiexec, with theqnswitch to install silently, and passing a value to the customRELEASENAMEvariable that the MSI uses
Building Docker images is an automated process, there’s no support for user input during the build. If you have an MSI which doesn’t support unattended installation you’ll need a different approach. That’s covered in Part 4.
Building the v1.0 Application Image
Every Docker image has a unique name, and you can also tag images with additional information like application version numbers. To build the image, switch to the directory containing the Dockerfile and MSI, and run docker build:
cd .\v1.0
docker build -t dockersamples/modernize-aspnet-ops:1.0 .
The output from docker build shows you the Docker engine executing all the steps in the Dockerfile. If you don’t have a copy of Microsoft’s ASP.NET image locally, then Docker starts by downloading it from Docker Store.
When the build completes you’ll have a new image stored locally, with the name dockersamples/modernize-aspnet-ops and the tag 1.0 indicating that this is version 1.0 of the app.
Running the Application in Docker
The sample application for the lab is a simple ASP.NET WebForms app, which the MSI installs to the default IIS website running on port 80. To start the application, use docker run and publish the port from the container onto the host, so the website is available externally:
docker run -d -p 80:80 --name v1.0 dockersamples/modernize-aspnet-ops:1.0
-dstarts the container in detached mode, so Docker keeps it running in the background-ppublishes port 80 on the container to port 80 on the host, so Docker directs incoming traffic into the container--namegives the container the namev1.0, so you can refer to it in other Docker commands
docker ps will show you that the container is running, together with the port mapping and the command running inside the container:
> docker ps
CONTAINER ID        IMAGE                                    COMMAND                   CREATED             STATUS                    PORTS                NAMES
1ab0fa9228b8        dockersamples/modernize-aspnet-ops:1.0   "C:\\ServiceMonitor..."   17 seconds ago      Up 1 second               0.0.0.0:80->80/tcp   v1.0
You can get basic management information about the container with docker top v1.0 to list the running processes, and docker logs v1.0 to view application log entries. In this case, IIS doesn’t write any logs to the console so there won’t be any log entries surfaced to Docker.
Accessing the Application
On a separate machine, you can open a browser and point to the host running your Docker container. The request enters the machine on port 80 which is mapped to the container, so Docker redirects the traffic - the application in the container handles the request and sends the response:
On the machine that’s running the container, you can’t browse to localhost and see the website, because of a limitation in Windows networking. Instead you need to get the internal IP address of the container and browse to that. The docker inspect command tells you all about a running container, and you can filter the output to show just the IP address:
> docker inspect --format '' v1.0
172.26.192.68
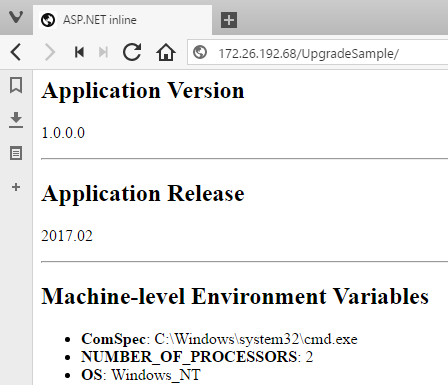
In my case the container’s IP address is 172.26.192.68, on your machine it will be different. From the local machine you can browse to that address and see the website.
Summary
Dockerizing an application from an existing MSI is very simple. This exampls uses a 3-line Dockerfile, a docker build command to create the image and a docker run command to start the container. Any MSI which supports unattended installation can be packaged in a Dockerfile in the same way.
In the next step you’ll see how to manage application upgrades and OS patches, by building a new Docker image and tagging it with an updated release number.