Upgrading Application Images
The Docker image from Part 1 is a snapshot of the application, built with a specific version of the app and a specific version of Windows. When you have an upgrade to the app or an operating system update you don’t make changes to the running container - you build a new Docker image which packages the updated components and replace the container with a new one.
Microsoft are releasing monthly updates to the Windows base images on Docker Store. When your applications are running in Docker containers, there is no ‘Patch Tuesday’ with manual or semi-automated update processes. The Docker build process is fully automated, so when a new version of the base image is released with security patches, you just need to rebuild your own images and replace the running containers.
Dockerfile for the v1.1 Application Image
The Dockerfile for v1.0 of the app deliberately used an old version of the Windows base image, so I can show an OS update and an application upgrade for v1.1.
Three details have changed in the new Dockerfile:
FROM microsoft/aspnet:windowsservercore-10.0.14393.693

COPY UpgradeSample-1.1.0.0.msi /

RUN msiexec /i c:\UpgradeSample-1.1.0.0.msi RELEASENAME=2017.03 /qn
- the
FROMimage is tagged with version10.0.14393.693, this is the latest Windows image. v1.0 was built on Windows version10.0.14393.576 - the MSI is version
1.1.0.0which contains an updated application release - the MSI parameter
RELEASENAMEhas been changed to2017.03- this value gets shown in the web app
The Dockerfile is still a simple 3-line script. All that’s changed are the version details for Windows and the application. When you choose a base image for your Dockerfile, you can either pin to a specific Windows version as I have, or use the generic tag to get the latest version. You could use FROM microsoft/aspnet:windowsservercore to always use the latest version of the base image when you build.
Using the latest image means you don’t need to modify your Dockerfile when there’s a new release, you just run docker build again, Docker finds the newer version of the base image, and automatically downloads it to use as the base image. The disadvantage is that you can’t see from the Dockerfile which version of Windows you’re using. The Docker platform doesn’t mandate a particular approach, so you can choose whatever best fits your workflow.
Building the Upgraded Application Image
The process to build the new version is identical, running docker build and applying a new tag to identify the version:
cd .\v1.1
docker build -t dockersamples/modernize-aspnet-ops:1.1 .
Docker will download the new version of Microsoft’s ASP.NET image as the first step of building the image. Docker images are physically stored in many layers, and the new version will use the same base layers as the previous version. The logical size of the microsoft/aspnet image is 10GB, but only a few hundred megabytes have changed between the versions, and only the changed layers are downloaded from the Hub.
Now I have two application images, tagged 1.0 and 1.1, each containing different versions of the application built on different versions of Windows. You can see the basic image details with the docker image ls command:
> docker image ls --filter reference='dockersamples/*'
REPOSITORY                                   TAG                 IMAGE ID            CREATED             SIZE
dockersamples/modernize-aspnet-ops           1.1                 dcea5c0e1be9        41 minutes ago      10.1 GB
dockersamples/modernize-aspnet-ops           1.0                 e763f76db517        About an hour ago   10 GB
You can see the images are listed at around 10GB each, but this is the logical size. Physically, the images share a lot of data in read-only image layers. If you want to see the layers that go into each image, Docker Captain Stefan Scherer has written a great utility which you can use to inspect Windows Docker images.
Upgrading the Running Application
Version 1.0 of the application is still running, and the container port is mapped to port 80 on the host. Only one process can listen on a port, so you can’t start a new container which also listens on port 80. If you want to test out the new version, you can run it alongside the existing version by mapping the container to a new port:
docker run -d -p 8081:80 --name v1.1 dockersamples/modernize-aspnet-ops:1.1
Now you can browse to version 1.1 from a remote machine using port 8081, or on the host machine by finding the new container’s IP address:

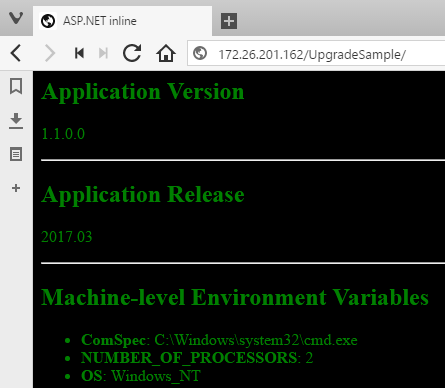
The new website shows the updated application version, which is read from the app DLL, and the release version number, which is read from the MSI parameter. The colors have changed too, to make the versions stand out when you’re running side-by-side.
Docker containers are such a lightweight unit of compute, you can easily run multiple containers like this when you verify a new release. They’re isolated too, so the new application could use a different version of the .NET framework, and the containers wouldn’t affect each other.
In non-production environments you can upgrade just by killing the old container and starting a new one, using the new image but mapping to the original port. That’s a manual approach which will incur a few seconds downtime. Docker provides an automated, zero-downtimne alternative which I’ll cover in the next step.
Summary
Upgrading your application package in Docker just means updating the versions in the Dockerfile and building a new image. That covers both application upgrades, and operating system patches.
You can automate the process for all your applications, so when Microsoft release a new version of the Windows base image, all your apps get rebuilt, ready to be upated in production.
In the next step you’ll learn how to use Docker to automate the update and rollback of application versions.